From Zero to Scale: Developing a robust Chat App with Redis,Node and Kafka.


Today I will explain how to create a highly scalable chat app with Node JS, Sockets, Redis Insight, Kafka, PostgreSQL and Turbo-repo.
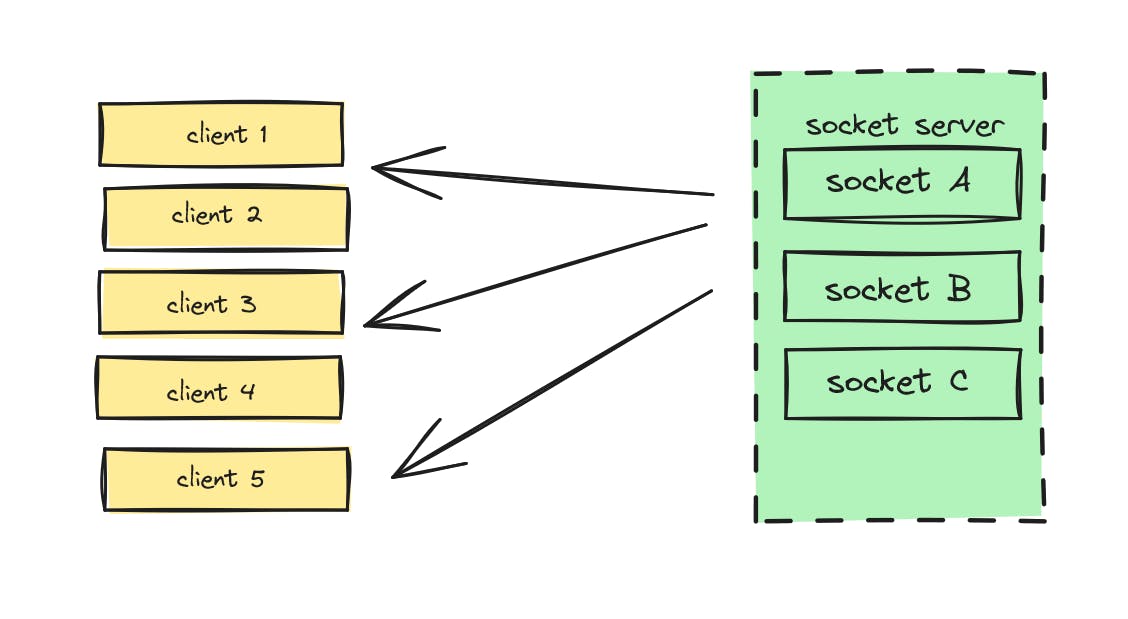
Part 1: Basic Architecture
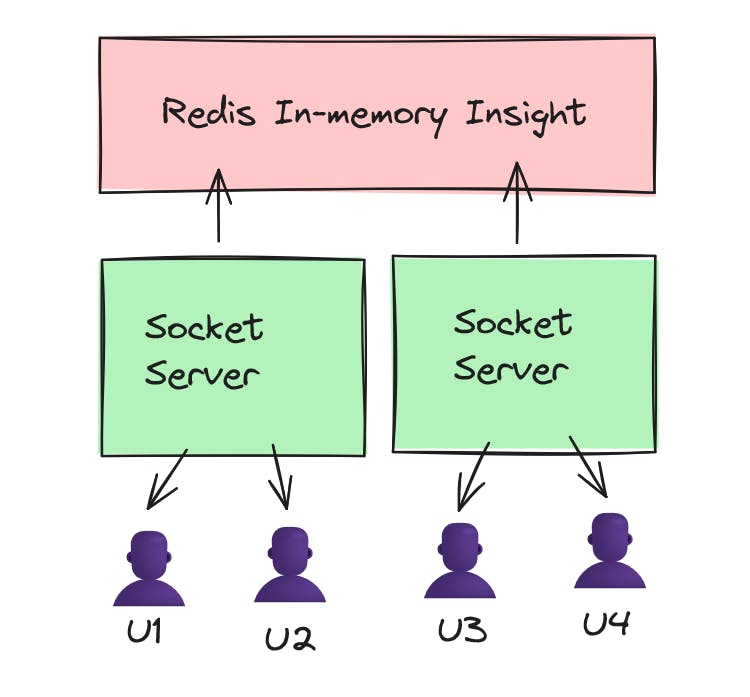
This Architecture shows a single DB/Memory storage center which is Redis in-memory DB Insight. Here we have socket server which emits events when users are connected. All the messages + events are in real time for all the concurrent users as we are using a single data source from where the messages are sent.
This is not scalable ! It will crash down
Pros:
All the users are connected in real time with sockets.
Every message sent by each user is displayed to all the users as they are connected to the same data source.
This is a scalable "socket chat app" but not a scalable application.
Cons:
If 100 users are connected at once, the backend will crash.
Scaling of systems is not possible.
Messages are not stored into a real Database.
If 100 users send concurrent messages, no way to optimize the bunch of messages as per query cost will increase exponentially.
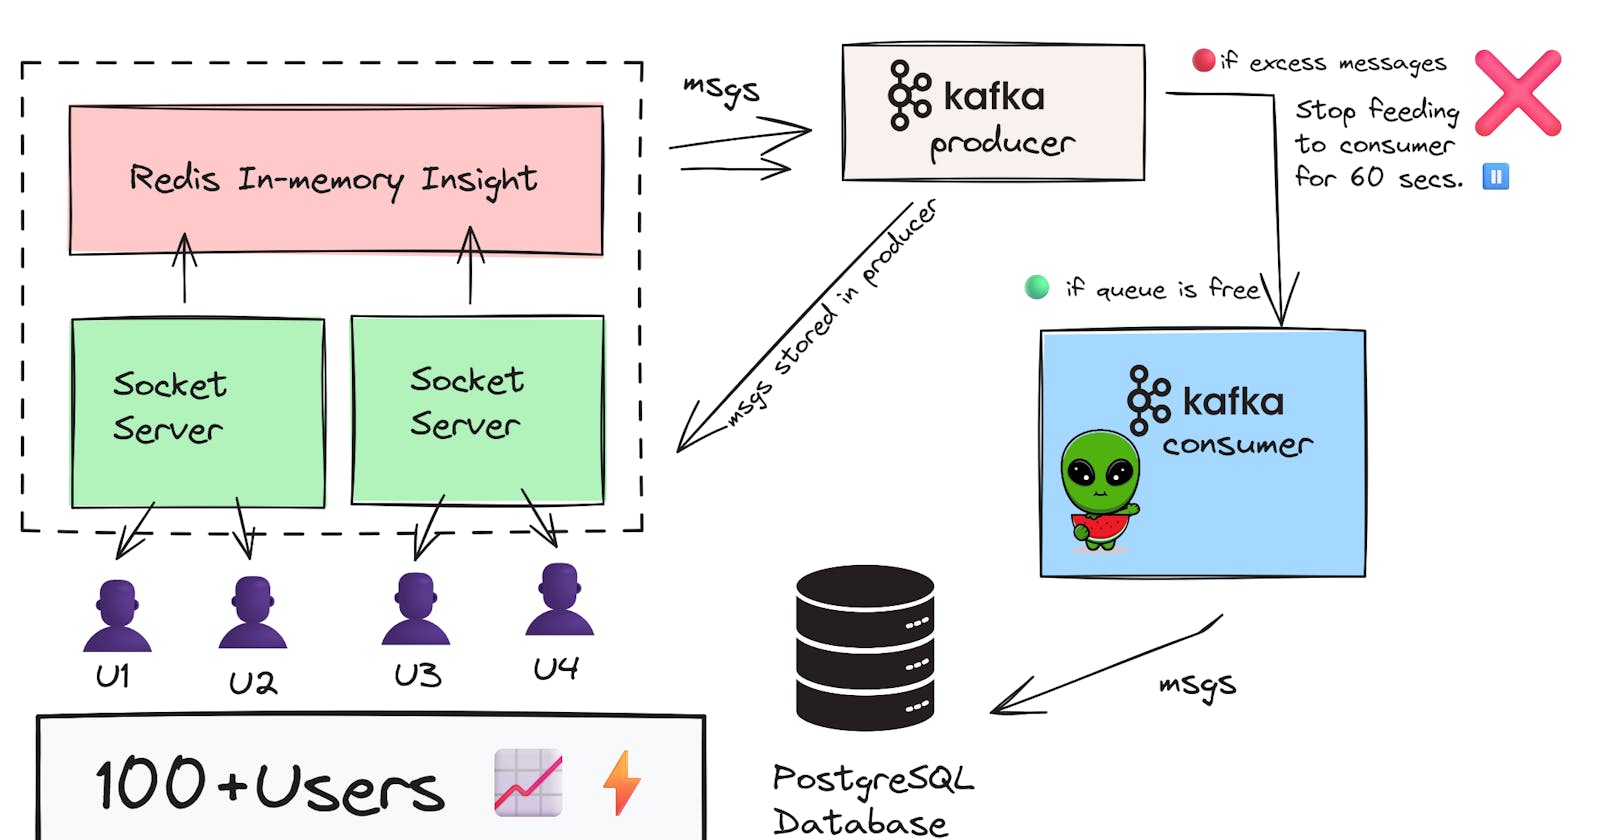
Part 2: Advanced Architecture
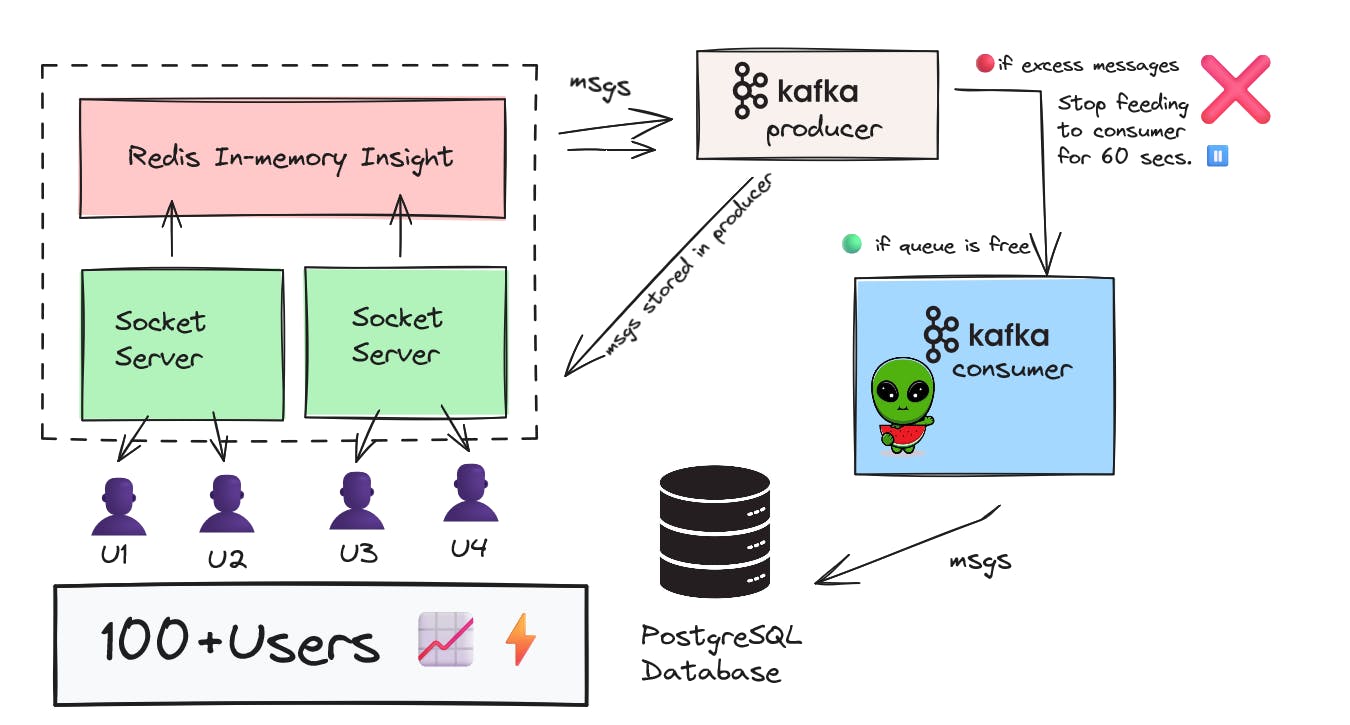
When your product will have 100+ users at the same time concurrently sending messages, the backend server will crash due to excessive amount of messages which is not handled by anyone nor by Socket Servers and not by Redis.
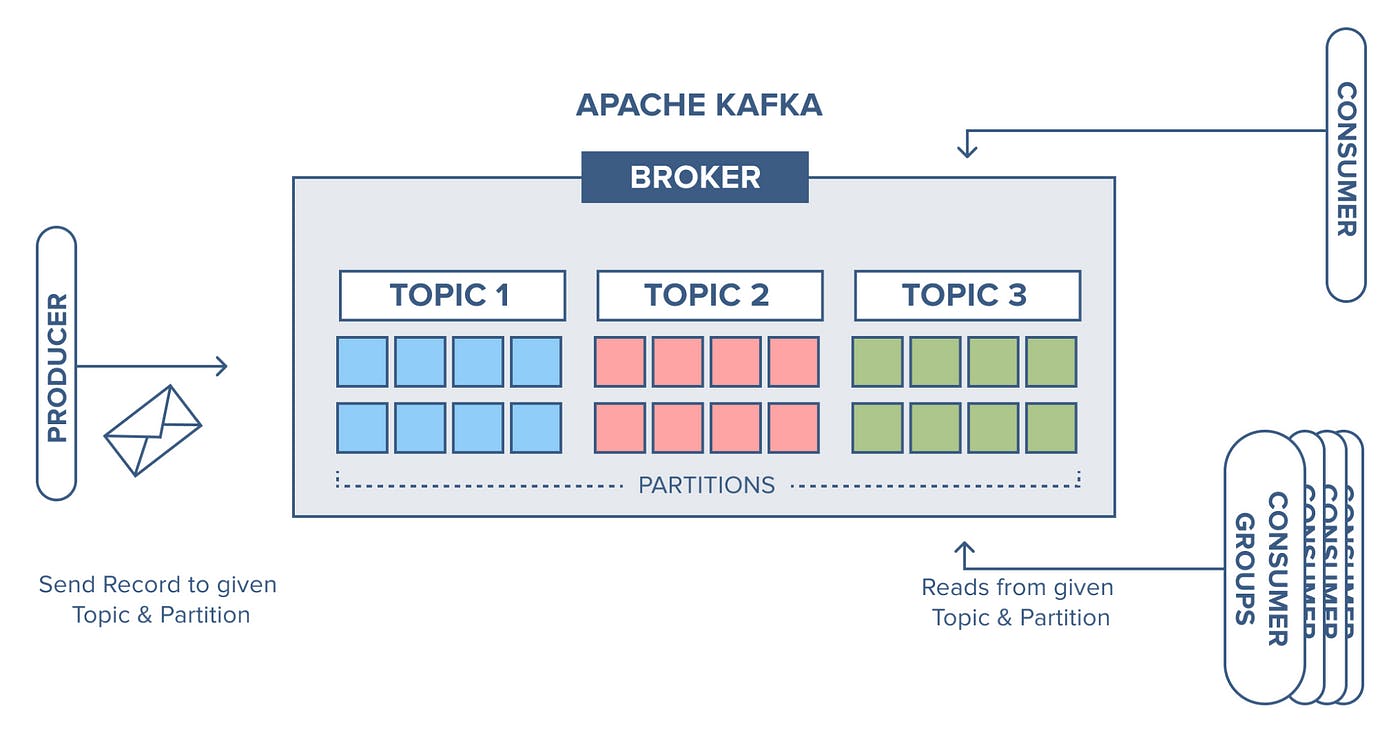
This is where Kafka comes into the picture.
The main two components of Kafka are Producer and Consumer.
Producer: Here the messages or data is being produced & stored based upon a certain topic. Messages are stored and can be fetched whenever needed from this Producer.
Consumer: Here the messages are consumed or eaten from the producer and then fed to a centralized database (in this case PostgreSQL Database).
Kafka is blazing fast when it comes to data transfer and storage, and distributed Data Pipelines.
This type of Architecture is highly scalable including the Database and the users. This design system can easily handle 100+ users like nothing !
What is a turborepo ?
A turbo repo is an excellent system to manage Javascript and Typescript codebases. You can setup multiple applications and codebases in a single repository. This gives an unfair advantage when you want to manage multiple applications like frontend, backend and database migrations, the docs module etc.
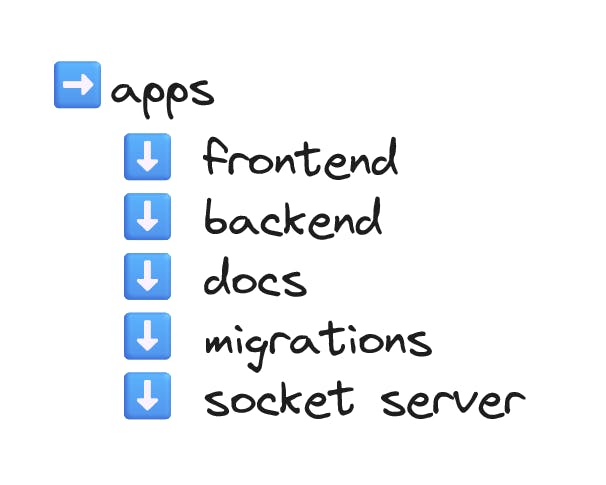
Let's setup a turbo repo for our project.
npx create-turbo@latest
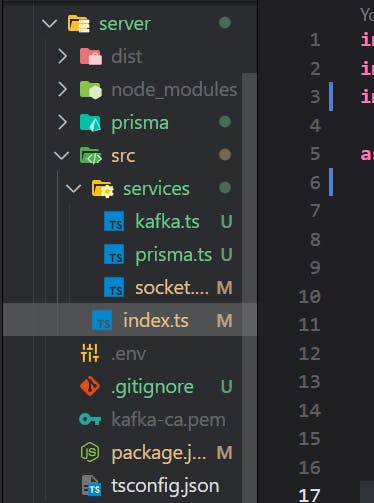
The server folder is what I have created for our backend socket server.
Initialize a simple node http server.
 import http from 'http';

 async function init() {
   const httpServer = http.createServer();
   const PORT = process.env.PORT ? process.env.PORT : 8000;

   httpServer.listen(PORT, () => {
     console.log(`HTTP SERVER started at PORT:${PORT}`);
   });
 }

 init();
Now let's install socket.io, you can also use bare websocket package but for this use case I chose to use socket.io.
 yarn add socket.io
 yarn add typescript tsc-watch ts-node @types/node io-redis
Let's use the re-usability concept and build our codebase efficiently with distributed file structure. I have also added the Redis functionality with the sockets.
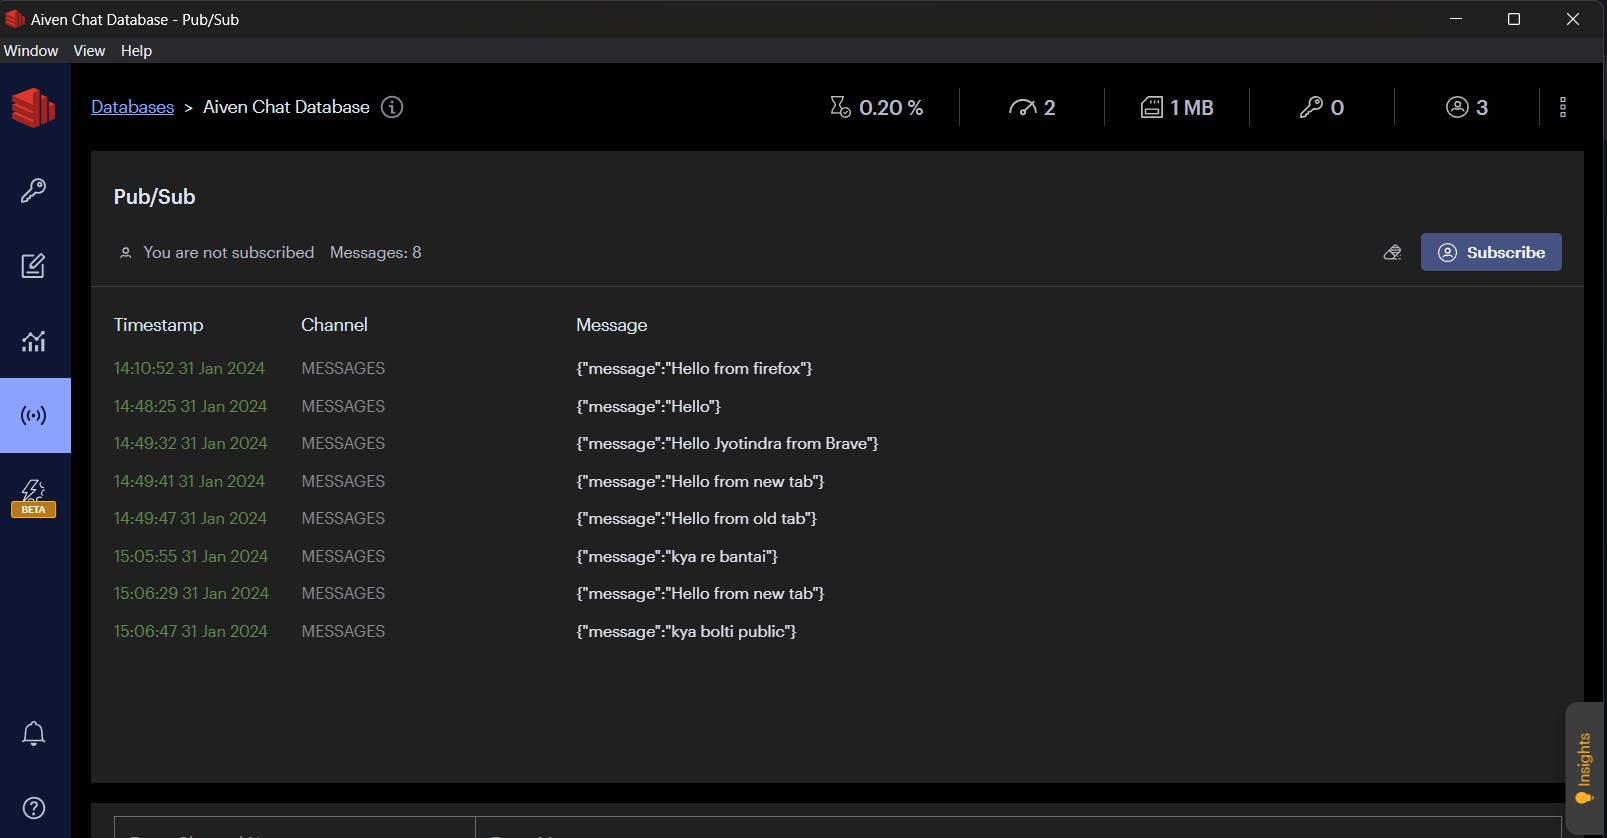
I am using the Pub-Sub Model of Redis for this project, which is the Publish Subscribe model as this will be a chat application so this model will do the work for us. (I will be coding the socket and Redis logic simultaneously). The Code Repository will be available in the end.

For Redis as an in-memory data structure storage used as a database and an caching tool, we have to setup it on the cloud. We can use any cloud provider, but Aiven stands as the best provider as you get most of the resources for free, only some heavy backed tools are priced.
So you can setup Redis, Kafka and PostgreSQL all on Aiven, but for this moment setup Redis on Aiven. Just copy and paste the credentials of that service to insert into the below code.
🟢server/src/services/socket.ts
import { Server } from 'socket.io';
import Redis from 'ioredis';

const pub = new Redis({
  host: 'redis-34d4334-jyotindrakt21-e509.a.aivencloud.com',
  port: 10488,
  username: 'default',
  password: 'AVNS_iRkBVt3975YgEowOrJN',
});
const sub = new Redis({
  host: 'redis-34d4334-jyotindrakt21-e509.a.aivencloud.com',
  port: 10488,
  username: 'default',
  password: 'AVNS_iRkBVt3975YgEowOrJN',
});

class SocketService {
  private _io: Server;

  constructor() {
    this._io = new Server({
      cors: {
        allowedHeaders: ['*'],
        origin: '*',
      },
    });
    sub.subscribe('MESSAGES');
    // console.log('Initializing Socker Server....');
  }

  public initListeners() {
    const io = this.io;
    console.log('Initialzed Socket Listeneres ....');
    io.on('connect', async (socket) => {
      console.log(`New Socket Connected`, socket.id);
      socket.on('event:message', async ({ message }: { message: string }) => {
        console.log('New Message Recieved', message);

        // Publish this message to redis
        await pub.publish('MESSAGES', JSON.stringify({ message }));
      });
    });

    sub.on('message', async (channel, message) => {
      if (channel === 'MESSAGES') {
        console.log('new message from redis', message);
        io.emit('message', message);
        console.log('Message Produced');
      }
    });
  }

  get io() {
    return this._io;
  }
}

export default SocketService;
Now you need to use this socket service in your whole application so navigate to your index.ts file, and add the socketService.
import http from 'http';
import SocketService from './services/socket'; //new line

async function init() {
  const socketService = new SocketService(); //new line
  const httpServer = http.createServer();
  const PORT = process.env.PORT ? process.env.PORT : 8000;
  socketService.io.attach(httpServer); //new line

  httpServer.listen(PORT, () => {
    console.log(`HTTP SERVER started at PORT:${PORT}`);
  });

  socketService.initListeners(); //new line
}
init();
Now in your turborepo you will have a folder named "web", this is your frontend codebase. Navigate to the app/ -folder.
Frontend Code with Socket Provider.
Socket Context Provider.
- web/context/socketProvider.tsx
'use client';
import React, { useCallback, useContext, useEffect, useState } from 'react';
import { Socket, io } from 'socket.io-client';

interface SocketProviderProps {
  children?: React.ReactNode;
}

interface ISocketContext {
  sendMessage: (msg: string) => void;
  messages: string[];
}

const SocketContext = React.createContext<ISocketContext | null>(null);

export const useSocket = () => {
  const state = useContext(SocketContext);

  if (!state) throw new Error(`state is undefined`);
  return state;
};

export const SocketProvider: React.FC<SocketProviderProps> = ({ children }) => {
  const [socket, setSocket] = useState<Socket>();
  const [messages, setMessages] = useState<string[]>([]);

  const sendMessage: ISocketContext['sendMessage'] = useCallback(
    (msg) => {
      console.log('Send Message', msg);
      if (socket) {
        socket.emit('event:message', { message: msg });
      }
    },
    [socket]
  );

  const onMessageRecieved = useCallback((msg: string) => {
    console.log('From server Msg Rec', msg);
    const { message } = JSON.parse(msg) as { message: string };
    setMessages((prev) => [...prev, message]);
  }, []);

  useEffect(() => {
    const _socket = io('http://localhost:8000');
    _socket.on('message', onMessageRecieved);
    setSocket(_socket);

    return () => {
      _socket.disconnect();
      _socket.off('message', onMessageRecieved);
      setSocket(undefined);
    };
  }, []);

  return (
    <SocketContext.Provider value={{ sendMessage, messages }}>
      {children}
    </SocketContext.Provider>
  );
};
page.tsx
'use client';
import { useState } from 'react';
import { useSocket } from '../context/socketProvider';
import classes from './page.module.css';

export default function Page() {
  const { sendMessage, messages } = useSocket();

  const [message, setMessage] = useState('');
  return (
    <div className={classes['container']}>
      <div>
        <input
          className={classes['chat-input']}
          onChange={(e) => setMessage(e.target.value)}
          type='text'
          placeholder='Message..'
        />
      </div>
      <button
        onClick={() => sendMessage(message)}
        className={classes['button']}
      >
        Send
      </button>
      <div>
        {messages.map((msg) => (
          <li key={msg}>{msg}</li>
        ))}
      </div>
    </div>
  );
}
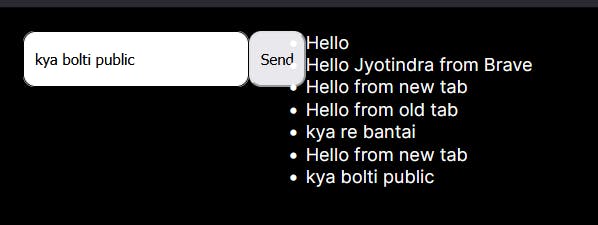
Run the code & send some random messages. These messages will be displayed on all clients: localhost:3000. Open different browsers and try them.
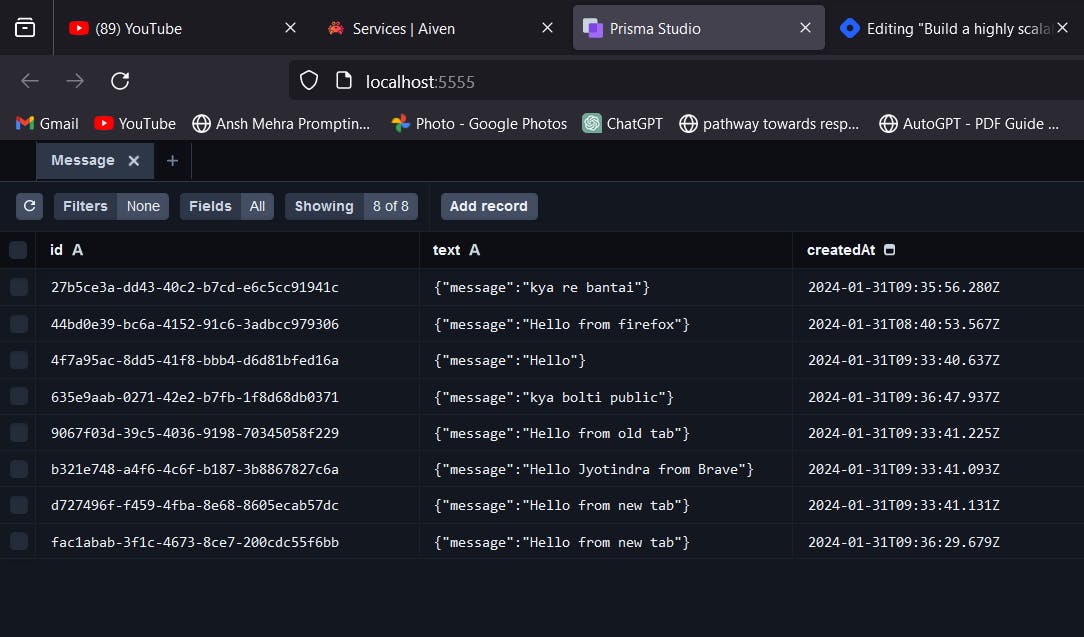
Prisma Studio Local DB
Aiven Configuration
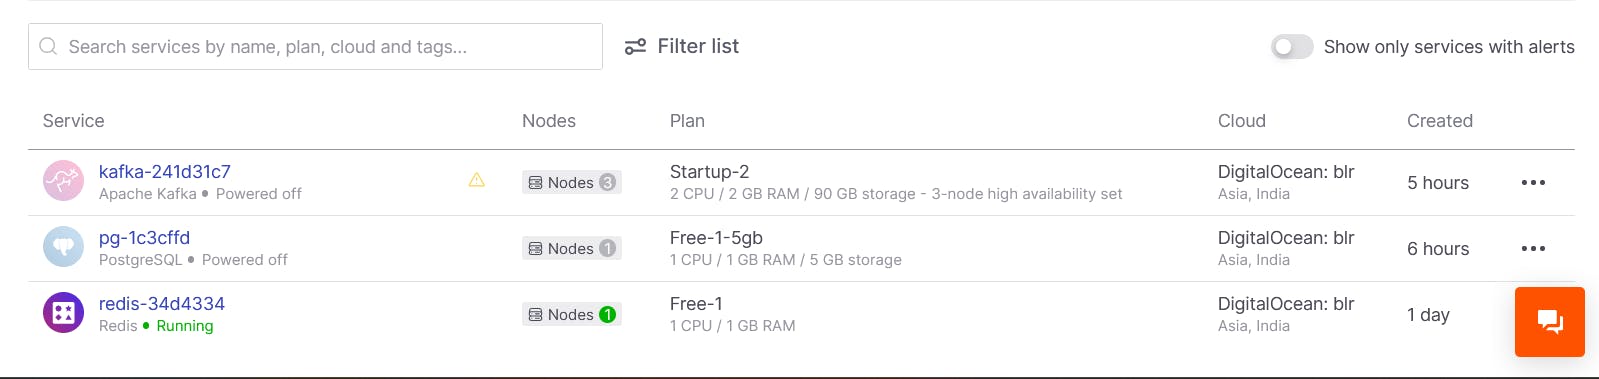
These are all my 3 services running on Aiven. (I have powered Off the billable services, you please don't).
Create a new folder in server named: prisma.
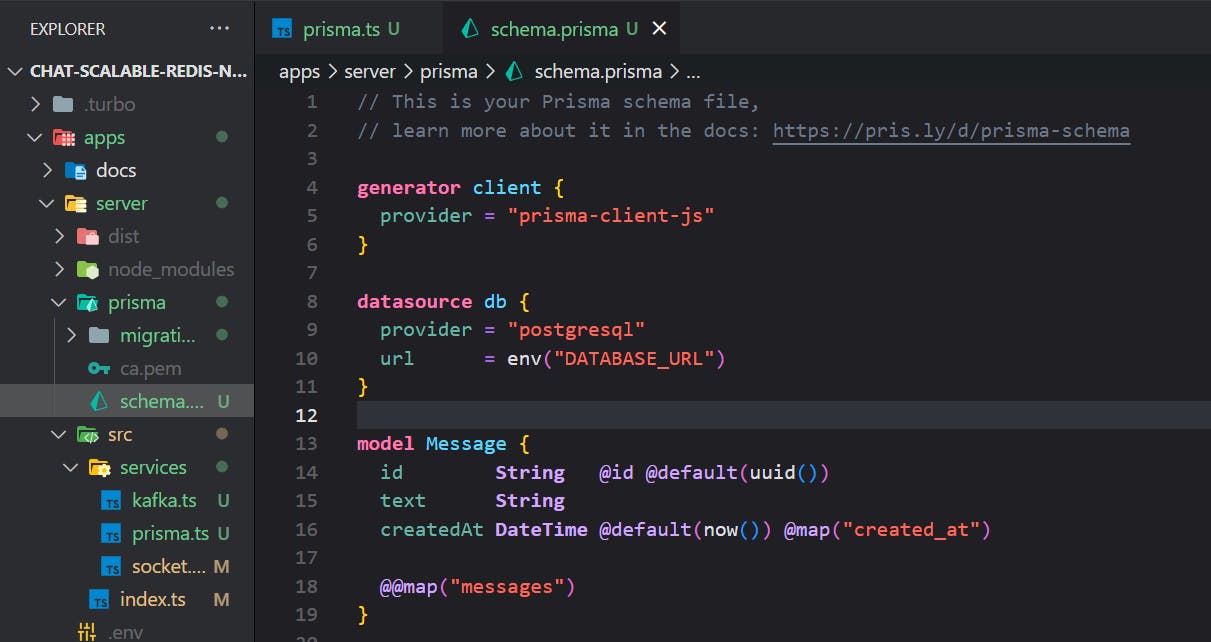
The Message Model is configured in schema.prisma. The Database URL can be found from the PostgreSQL DB you configured on Aiven. Grab the service URI and paste it in .env file.
Kafka use case
Explain:
The kafka service code is present in: server/src/services/kafka.ts
import { Kafka, Producer } from 'kafkajs';
import fs from 'fs';
import path from 'path';
import prismaClient from './prisma';

const kafka = new Kafka({
  brokers: ['kafka-241d31c7-jyotindrakt21-e509.a.aivencloud.com:10501'],
  ssl: {
    ca: [fs.readFileSync(path.resolve('./kafka-ca.pem'), 'utf-8')],
  },
  sasl: {
    username: 'avnadmin',
    password: 'AVNS_7Ms1UTbtCBc4TDNpGgM',
    mechanism: 'plain',
  },
});

let producer: null | Producer = null;

export async function createProducer() {
  if (producer) return producer;

  const _producer = kafka.producer();
  await _producer.connect();
  producer = _producer;
  return producer;
}

export async function produceMessage(message: string) {
  const producer = await createProducer();

  await producer.send({
    messages: [{ key: `message-${Date.now()}`, value: message }],
    topic: 'MESSAGES',
  });
}

export async function startMesssageConsumer() {
  console.log('Kafka Consumer is running');
  const consumer = kafka.consumer({ groupId: 'default' });
  await consumer.connect();
  await consumer.subscribe({ topic: 'MESSAGES', fromBeginning: true });

  await consumer.run({
    autoCommit: true,
    eachMessage: async ({ message, pause }) => {
      console.log(`New Message Recieved...`);
      if (!message.value) return;
      try {
        await prismaClient.message.create({
          data: {
            text: message.value?.toString(),
          },
        });
      } catch (error) {
        console.log('Something is wrong');
        pause();
        setTimeout(() => {
          consumer.resume([{ topic: 'MESSAGES' }]);
        }, 60 * 1000);
      }
    },
  });
}

export default kafka;
The Kafka Credentials are again fetched / inserted from Kafka Service which is configured in Aiven.
Fs & Path Modules
The Fs (file systems) and path modules are inbuilt packages in javascript / typescript which gives us the advantage to access local files and path of users system. Here we use fs module to read the CA SSL certificates that we have downloaded from Aiven Kafka Configuration Panel.
Run your codebase now!
All the configurations have been done now, as you are using TurboRepo you can start both frontend and backend simultaneously by adding the yarn dev command in the root directory terminal.
The Terminal should look like this :
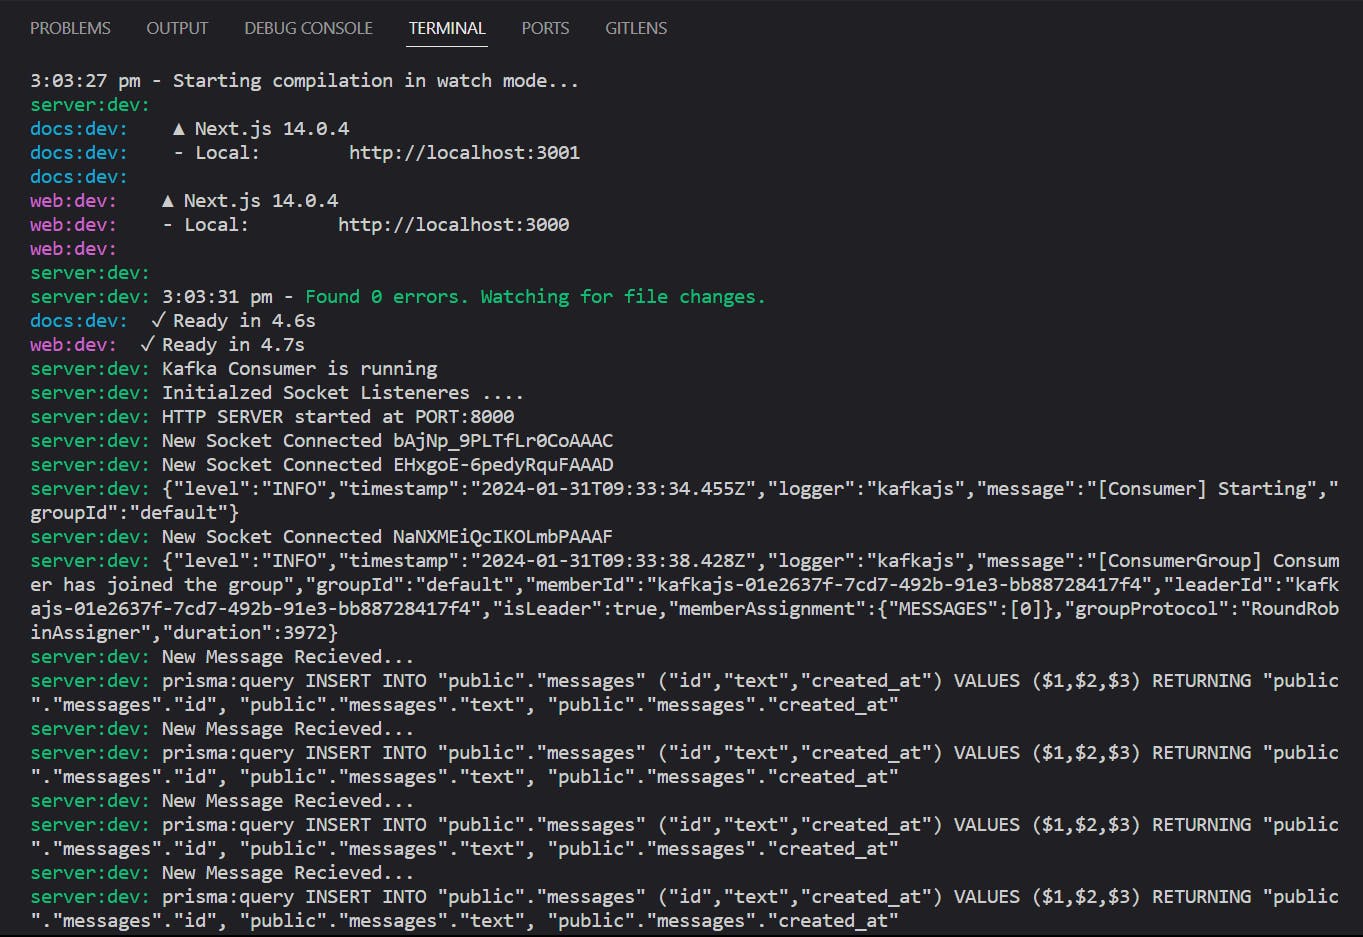
These are the messages that are being consumed by the Kafka Consumer we built and then these messages are consumed by our PostgreSQL Database.
The Code Repository: https://github.com/JaguarsCodehub/scalable-chat-redis-socket-node
Thank You 🧠✨!
For staying till the end of this article, Make sure you like and comment on this blog and share this with your friends. Trying to be technically sound and consistent.
Follow me on Twitter for daily tech content ! ⚡